Sunday, September 30, 2018

21 Chicken Dinner Recipes with FreeStyle Points

We love the Weight Watchers Freestyle program! If you haven’t read the new guidelines, it’s pretty comparable to the previous SmartPoints program. There are a few differences, including a revised points calculation based on updated U.S. Dietary Guidelines. That means that it’s easier than ever to lose weight by counting points instead of calories. They also added a ton of zero-point foods that you can eat in unlimited quantities. And, you’re also allowed to rollover points from one week to the next, so you can save up your points for a delicious treat!

There are lots of great foods you can eat on the Weight Watchers program, but we can never get enough chicken dinner recipes with Freestyle points. This lean protein will fill you up without breaking your points bank. Some of these recipes are as low as 2 points if you’re trying to save up, while others are a bit more indulgent at 12 points. Either way, they’re all completely delicious and made easy – one-pot meals and recipes that use the Instant Pot or slow cooker. Perfect for weeknight dinners and meal-planning enthusiasts!

1. Instant Pot Creamy Salsa Verde Chicken (5 Freestyle Points)

It doesn’t get easier than this incredible Instant Pot recipe! It only takes 15 minutes under high pressure to transform lean chicken breasts into a tender, shreddable meal. This recipe makes great leftovers, too, so don’t be afraid to double the recipe for great chicken dinners all week long.

2. Slow Cooker Fried Chicken (2 Freestyle Points)

This is one of the most popular recipes on the SkinnyMs website for good reason. Fried chicken – made easier by using a slow cooker – for only 2 Freestyle points per serving? You better believe this is one of our go-to chicken dinner recipes with Freestyle points.

3. Southwest Chicken Casserole with Black Beans Recipe (6 Freestyle Points)

Everyone loves a good casserole. They’re easy to make, even easier to meal prep, and they make tons of leftovers! Make this quick-and-easy casserole for a weeknight dinner and enjoy the leftovers for lunch the next day. If you have too many leftovers, don’t worry: this casserole freezes exceptionally well.

4. Skinny Spinach Stuffed Chicken Breast (2 Freestyle Points)

This easy stuffed chicken breast recipe is perfect when you don’t have many points to spare on dinner. It might seem fancy to serve stuffed chicken breasts for a weeknight dinner, but this recipe is so simple it’s ready in only 25 minutes!

5. One Pan Mediterranean Chicken Meatballs, Tomatoes, and Chickpeas (3 Freestyle Points)

This is one of my favorite chicken dinner recipes with Freestyle points when I don’t have many points left in the day. It’s not only packed full of flavorful ingredients, but it’s incredibly filling, too (thanks to all the protein and fiber in the chickpeas).

6. Healthier One-Pot Sesame Chicken Recipe (7 Freestyle Points)

You’ll never need to order take-out again once you learn this One-Pot Sesame Chicken recipe. It has all the flavor you love from your favorite Chinese restaurant, but no MSG or added ingredients. The best part? You only need to dirty up one pot making it, so clean-up is a breeze!

7. Baked Chicken Quesadilla Casserole (6 Freestyle Points)

When you feel like having a “cheat” day, make this quick-and-easy casserole instead. It’s filled with ooey-gooey cheese and sweet corn, so it feels decadent and rich. But, it’s only 6 Freestyle points and it’s packed full of protein and fiber.

The post 21 Chicken Dinner Recipes with FreeStyle Points appeared first on Skinny Ms..


source https://skinnyms.com/chicken-dinner-recipes-with-freestyle-points/

Parmesan Eggplant and Spinach Dip | Healthy Dip Recipe

A few weeks ago I made this parmesan eggplant and spinach dip  to serve as an app at a family get-together. Frankly, I was blown away by the response. In all honesty, my family can be a tough crowd to cook for. Between a variety of different food allergies and dietary restrictions, finding recipes that everyone can enjoy has always been tough. So when my family all but wiped this dish clean in a matter of minutes, I knew I had found a keeper.

Combining the fresh, earthy flavor of baba ghanoush with the warm, creamy texture of baked spinach dip, this super healthy dip is sure to be a hit.

Don’t Be Afraid to Double Dip

Okay, so if you’re sharing this dip with guests, maybe stick to the no double-dipping rule. You know, manners. BUT, with a dip this healthy, there’s no reason you can’t go in for a second helping. (Just maybe grab a fresh chip first, thanks.)

I’ll be the first to admit that I tend to go a little overboard when dip is involved. I can usually resist the temptation to chow down on most appetizers. But if someone puts out a dip, it’s game over for my self-control.

And it doesn’t help that dip is pretty much a portion control nightmare, especially for anyone counting calories. Once you’ve lapsed into the mindless snacking zone, it can be tough to remember just how many chips you’ve dipped, let alone how much dip was on each. And no one wants to be that girl breaking out a tablespoon at a party to measure out an exact portion. (Although if that works for you, by all means go for it.)

With all this in mind, I’ve made it a priority to find healthy dip recipes that allow for a little indulgence that won’t undo my whole day. This healthy parmesan eggplant and spinach dip is a perfect low-cal dip. With only 58 calories in a quarter cup serving, this dip gives me the wiggle room I need when it comes to portion control. Can I recommend eating the whole thing in one sitting? No (although you’ll probably want to.) But with a dip this healthy, you can take an extra scoop or two without busting your calorie budget for the day.

And It’s Easy to Make

A weird clean-eating myth that I still sometimes encounter claims that clean cooking is somehow more difficult or time consuming.

The truth is, when you’re cooking with clean, simple ingredients, your recipe is probably pretty clean and simple too.

With just six simple ingredients, this parmesan eggplant dip is super easy to whip up and ready to serve in under an hour.

Pita chips are my new obsession, and they go great with this dip. It also pairs well with fresh veggies if you’re looking to keep things extra healthy. Try it with your favorite chips, veggies, bread, or crackers, and be sure to leave a comment letting us know your favorite combination!

Parmesan Eggplant and Spinach Dip | Healthy Dip Recipe

Prep Time: 15 minutes

Cook Time: 30 minutes

Parmesan Eggplant and Spinach Dip | Healthy Dip Recipe

Yield: 8 servings | Serving Size: 1/4 cup | Calories: 58 | Total Fat: 3 g | Saturated Fat: 1 g | Trans Fats: 0 g | Carbohydrates: 6 g | Fiber: 3 g | Sugars: 3 g | Protein: 3 g | Cholesterol 3 g | Sodium 131 mg | Smartpoints (Freestyle): 1 |

Ingredients

  • 1 large eggplant, peeled and cubed
  • 1 tablespoon olive oil
  • 1/4 teaspoon kosher salt
  • 2 cups baby spinach
  • 3 cloves garlic, minced
  • 1/3 cup fat-free parmesan cheese, shredded

Instructions

  1. Preheat oven to 400 degrees and line a baking sheet with foil.
  2. Combine the eggplant, half the olive oil, and salt. Toss well to coat the eggplant in the oil and spread in an even layer on the baking sheet. Bake for 10 to 15 minutes or until the eggplant just begins to brown.
  3. While the eggplant is roasting, heat the remaining olive oil in a skillet on medium heat. Once hot, add the spinach and garlic, Cook until wilted.
  4. Once the spinach and eggplant are cooked, add the eggplant to a food processor and blend until smooth, add a tablespoon or two of water as needed if the eggplant is too thick. Add the spinach and half the parmesan cheese to the food processor and pulse until combined.
  5. Spray a small casserole dish with non-stick spray and add the eggplant mix in an even layer. Sprinkle the remaining cheese on top. Bake for 10 minutes or until browned and bubbly. Serve hot with vegetables, crusty bread, pita, or your favorite crackers!
https://skinnyms.com/parmesan-eggplant-and-spinach-dip/

Another Dip Recipe:

Roasted Beet and Hazelnut Vegetable Dip

Sweet roasted beets and toasted hazelnuts combine for a rich, earthy, naturally sweet flavor in this veggie-based dip. Along with a savory flavor boost from garlic and thyme, maple syrup gives this vivid and delicious party dip an extra touch of subtle sweetness.

We’ve got healthy recipes for every meal, mood, and season! Follow us on Pinterest and Instagram for the latest healthy-living tips, tricks, and recipe! 

The post Parmesan Eggplant and Spinach Dip | Healthy Dip Recipe appeared first on Skinny Ms..


source https://skinnyms.com/parmesan-eggplant-and-spinach-dip/

Saturday, September 29, 2018

Vegan Avocado Mayonnaise

As far as condiments go, mayonnaise is easily among the most controversial. Some people swear by it, others have sworn off it. And even among devoted mayo fans, there’s the ever-present Hellmann’s vs. Miracle Whip debate to consider. (Not to mention the heated sub-debate: Is Miracle Whip even mayo in the first place?)

Generally speaking, vegans get to opt out of this age-old argument altogether. An egg-based product, traditional mayo is definitely not a vegan-friendly condiment. However, even among non-vegans, this popular spread can be off-putting. Between the high-cholesterol and plethora of artificial ingredients in traditional mayonnaise, even mayo fans (myself included) may find themselves taking a pass on the spread.

Fortunately, recipes like this vegan avocado mayonnaise offer a healthy, egg-free alternative. Whether you’re vegan, eating clean, or just kind of weirded out by the idea of an egg-based condiment (face it, it’s kinda weird if you think about it too hard), this vegan recipe provides a simple, healthier homemade version of the popular spread.

Ingredients

As I mentioned, traditional store-bought mayo is usually high in cholesterol and packed with unhealthy artificial ingredients. With just six simple, clean ingredients, this homemade vegan mayo is a refreshing update. Once you learn how to make vegan avocado mayonnaise, you’ll never go back to the store bought stuff.

Plain, unsweetened soy milk adds protein and thickens easily for a rich, creamy mayo spread. Just be sure to stick with soy. Almond or coconut milk may make a flawless swap for soy in your cereal or coffee, but unfortunately other dairy substitutes just won’t have the same effect here.

Avocado and olive oil eliminate the need for eggs while adding healthy fats. Avocado also helps this mayo achieve a thicker, creamy consistency as well as a tasty avocado flavor. Because why settle for plain mayo when you can have avocado mayo? Apple cider vinegar and lemon juice complete this recipe by adding a subtle, tangy mayo flavor.

How To Make Vegan Avocado Mayonnaise

This simple vegan mayo recipe is easy to make and incredibly quick. To make this healthy spread, just combine all ingredients, except for the olive oil, in a blender and blend on high until smooth.

Scrape down the sides of the blender, then return to high speed. Gradually add in the olive oil and continue to blend for about two minutes. Allow to chill in an airtight container for at least one hour before serving. You can store and refrigerate leftovers up to a week.

This simple vegan avocado mayonnaise is so quick and easy to make. You can easily whip up this staple on a weekly basis so you always have it on hand. Use this healthy mayo substitute anywhere you would normally use mayonnaise. Spread it on sandwiches and burgers or use it as a base for your favorite aiolis.

However you use it, this vegan avocado mayonnaise is a healthy alternative that will cut the fat, cholesterol, and controversy of traditional mayo. Enjoy!

How to Make Vegan Avocado Mayonnaise

Prep Time: 2 minutes

Cook Time: 5 minutes

about 2 cups or 32 servings

1 tablespoon

How to Make Vegan Avocado Mayonnaise

Yield: 2 cups or 32 servings | Serving Size: 1 Tablespoon | Calories: 57 | Total Fat: 6 g | Saturated Fat: 1 g | Trans Fat: 0 g | Carbohydrates: 1 g | Fiber: 0 g | Sugar: 0 g | Protein: 0 g | Cholesterol: 0mg | Sodium: 32 mg | SmartPoints (Freestyle): 2 |

Ingredients

  • 1/2 cup plain soy milk
  • 2 teaspoons lemon juice
  • 1 teaspoon apple cider vinegar
  • 1 avocado, peeled, pit remove, and roughly chopped
  • 1/2 teaspoon Kosher salt
  • 3/4 cup olive oil

Instructions

  1. In a blender, combine all ingredients except for the oil. Blend on high until smooth.
  2. Scrap down the sides and turn the blender back on to high. While blending, gradually add the oil and continue blending until the mixture is thick. Continue to blend for about 2 minutes.
  3. Chill for 1 hour before serving. Store in an air tight container for about 1 week.
https://skinnyms.com/vegan-avocado-mayonnaise/

Follow us on Pinterest and Instagram for more clean and vegan alternatives to all the necessary staples!

The post Vegan Avocado Mayonnaise appeared first on Skinny Ms..


source https://skinnyms.com/vegan-avocado-mayonnaise/

Friday, September 28, 2018

Best Ever Spinach and Artichoke Stuffed Chicken

At a party over the holidays, someone informed me that spinach and artichoke dip is no longer “in.”

I had no idea that food, especially near-universally crowd-pleasing food, could fall so easily out of vogue.

Then again, this came from my sister, the same one who has insisted for years that no one gets acrylic nails anymore. All I can say is last time I went in for a full set, I was in line behind plenty of other ladies waiting to get plastic glued to their fingertips.

Likewise, my sister imparted this sage wisdom over none other than a spinach and artichoke dip that she herself had made. So whether or not it’s still “in,” we all still love it.

Fortunately, despite its allegedly waning popularity, there are now even more ways to enjoy this beloved party dip. Case in point: our Best Ever Spinach and Artichoke Stuffed Chicken. No need to wait for the next football party or spring for an app on your next night out. Now you have an excuse to enjoy that cheesy, delicious spinach and artichoke flavor on a regular old weeknight.

We all know chicken is a go-to weeknight staple. It’s inexpensive, nutritious, and almost everyone likes it. But, like most weeknight staples, it can get a little repetitive. Now that we’re responsible for cooking our own meals, my sister and I laugh about all the times we looked at our mom across the dinner table and said, “Chicken again?

Look, there’s nothing wrong with chicken, but it can get a little bland. Fortunately, it’s also one of the most versatile protein sources we have. If you know how to dress it up, there’s no reason chicken should ever feel like “chicken again.”

If you’re looking to mix things up a bit, this Spinach and Artichoke Stuffed Chicken is a great chicken recipe to add to your repertoire. This recipe is fun, simple, and (contrary to what you may think of spinach artichoke dip) light and healthy.

This recipe uses fat free cream cheese to cut back on fat and calories while still providing that cheesy, creamy filling. With canned artichokes, cooked baby spinach, and garlic, this stuffed chicken tastes just like a piping hot dish of spinach and artichoke dip.

This simple recipe takes less than 30 minutes, prep and cooking time included. It’s the perfect way to add some fun and variety to your weeknight meals without any added stress. Cheesy and delicious, it’s sure to be a crowd pleaser, whether you’re cooking for a family or just yourself.

The jury may still be out on whether or not spinach and artichoke is still “in.” But this Spinach and Artichoke Stuffed Chicken is definitely trending… at least in my book. Cheesy, delicious, and super simple, I think I’ll hold onto this recipe.

If you like this Spinach and Artichoke Stuffed Chicken, try some of our other spinach and artichoke recipes:


Best-Ever Spinach and Artichoke Stuffed Chicken

Prep Time: 5 minutes

Cook Time: 15 minutes

Best-Ever Spinach and Artichoke Stuffed Chicken

Yields: 4 servings | Calories: 389 | Total Fat: 12g | Saturated Fat: 4g | Trans Fat: 0g | Cholesterol: 139mg | Sodium: 806mg | Carbohydrates: 16g | Fiber: 6g | Sugar: 4g | Protein: 54g | SmartPoints (Freestyle): 4

Ingredients

  • 6 ounce fat-free cream cheese
  • 1 (15 ounce) can artichoke hearts, drained and chopped
  • 1 cup baby spinach, cooked and liquid squeezed out
  • 3 cloves garlic, minced
  • 1/2 cup fat-free shredded parmesan cheese
  • 1 teaspoon Kosher salt
  • 1/2 teaspoon ground black pepper
  • 4 (6 ounce) boneless and skinless chicken breast
  • 1 tablespoon olive oil

Instructions

  1. Pre-heat oven to 400 degrees.
  2. In a mixing bowl, whip the cream cheese on high until fluffy. Add the artichokes, spinach, garlic, cheese, half the salt, and half the pepper. Mix on low speed just until combined.
  3. Carefully cut open the side of the chicken breast to create a pocket. Stuff each with the cream cheese mixture. About 3 to 4 tablespoons per chicken breast.
  4. In a large oven safe skillet, heat the olive oil. Once the oil is very hot, add the chicken carefully so the filling does not fall out. Cook each side about 1 to 2 minutes or until each side golden brown. Transfer the pan to the oven and cook for about 10 more minutes or until the chicken is cooked though.
  5. Remove from the oven and let sit for about 5 minutes before serving. Enjoy!
https://skinnyms.com/spinach-and-artichoke-stuffed-chicken/

Looking for more ways to dress up your weeknight dinners? Follow us on Pinterest and Instagram for more heathy recipes!

The post Best Ever Spinach and Artichoke Stuffed Chicken appeared first on Skinny Ms..


source https://skinnyms.com/spinach-and-artichoke-stuffed-chicken/

Thursday, September 27, 2018

Apple Cardamom Bread Pudding

Every time I make bread pudding, I chastise myself for not making it more often! Maybe it’s because I don’t always have extra bread around, or perhaps it’s because I’m never quite sure if bread pudding is supposed to be for breakfast or dessert. The last time I made this fall-flavored Apple Cardamom Bread Pudding, I realized something: I don’t have to have a plan for it! It’s delicious hot out of the oven for breakfast, and the leftovers can be served for dessert later in the day.

This hearty dish is perfect for cold fall and winter days. When the days start to get shorter and the air crisps up a bit, I find myself craving sweet, rich food. That doesn’t always work out too well for my waistline, though. Luckily, with recipes like this Apple Cardamom Bread Pudding, I can have my cake and eat it, too! You see, most bread pudding recipes are loaded up with excess sugars. It takes a lot of sugar to sweeten something as savory as whole-wheat bread. But, we found a brilliant workaround. Want to know how we did it?

The Power of Apples, Cinnamon, and Cardamom

You might be surprised to learn that cinnamon and cardamom aren’t exactly sweet on their own. They sort-of trick our taste buds into thinking they’re a sweet spice. That’s because baking recipes almost always pair them with sugar. If you were to taste a pinch of them on their own, you’d find that they’re super pungent, slightly spicy, and a touch earthy.

But, when you combine them with something sweet, these spices really bloom. They actually help fill out our palates, allowing us to really taste any sweetness in the dish. Using these spices is part-one of our super-secret hack to make this Apple Cardamom Bread Pudding recipe more healthy. Part two: applesauce!

Instead of using a ton of processed sugar, we swapped in applesauce instead. It gives the bread pudding extra body while allowing the naturally sweet apples to shine. If you have an Instant Pot, this is the perfect opportunity to try out our homemade applesauce recipe! Then, we toss in a handful of peeled chunks of apples to really amp up that naturally fruity flavor.

Let’s Chat Bread

Bread pudding might not be popular at your house because you may not eat a lot of bread. We don’t at my house, either! I actually had to start stocking my freezer with a few loaves of bread so I could make this warming, fall-friendly dish for weekend brunch. You can certainly swap-in your favorite gluten-free bread if you’re not a grain eater. But, for those of you who can eat gluten, we have a favorite whole-wheat bread that we’d love for you to try.

If you’ve never had Dave’s Killer Bread Organic 21 Whole Grains and Seeds, you’re in for a treat! This delicious bread is full of heart-healthy whole grains and seeds. In addition to being fully vegan, it’s also certified USDA Organic and verified by the Non-GMO project. The ingredients list is packed full of foods you can actually read (no funky chemicals on this list!). And, as if that wasn’t enough, each slice has 5 grams of fiber, 5 grams of protein, 250 milligrams of omega-3 fatty acids, and 22 grams of whole grains.

And there you have it: A healthy version of Apple Cardamom Bread Pudding that tastes great and satisfies your sweet tooth without wreaking havoc on your waistline. Talk about the perfect way to celebrate the arrival of autumn and winter!

Apple Cardamom Bread Pudding

6

Apple Cardamom Bread Pudding

Yield: 6 Servings | Serving Size: About 1 cup | Calories: 256 | Total FatL 16 g | Saturated Fat: 12 g | Trans Fat: 0 g | Carbohydrates: 23 g | Fiber: 3 g | Sugar: 7 g | Protein: 8 g | Cholesterol: 93 mg | Sodium: 190 mg | SmartPoints (Freestyle): 9

Ingredients

  • 6 slices whole-wheat bread (we like Dave's Killer Bread)
  • 1 1/2 cups reduced-fat coconut milk (or, milk of your choice)
  • 3 large eggs, lightly beaten
  • 1 cup unsweetened applesauce
  • 3/4 teaspoon ground cardamom
  • 1 teaspoon ground cinnamon
  • 1/4 teaspoon ground nutmeg
  • 1 cup peeled, cored, and chopped apples

Instructions

  1. Preheat the oven to 325° F. Grease an 8x8 baking dish with nonstick spray and set aside.
  2. Cut your bread into 1-inch cubes and place them in the prepared baking dish.
  3. Meanwhile, in a large bowl, combine the coconut milk, eggs, applesauce, cardamom, cinnamon, and nutmeg. Beat the mixture with a whisk until everything is well combined.
  4. Fold the apples into the mixture before pouring the contents over the bread cubes. Press the cubes down into the mixture to make sure each one soaks up the liquid.
  5. Bake for 45 minutes, until the pudding is set and no longer jiggles when you shake the pan. You can also insert a knife into the middle of the pudding to make sure it comes out clean.
  6. Allow the pan to cool on a baking rack for at least 15 minutes before slicing.
  7. This pudding can be served hot or cold. Store it in the refrigerator (covered) for up to two days.
https://skinnyms.com/apple-cardamom-bread-pudding-recipe/

For more breakfast and brunch recipes, check out our Facebook feed. We’re always updating it with seasonal, allergen-friendly, deliciously healthy recipes. 

The post Apple Cardamom Bread Pudding appeared first on Skinny Ms..


source https://skinnyms.com/apple-cardamom-bread-pudding-recipe/

How to Tighten Your Post-Baby Belly with These 4 Moves

If you’ve recently had a baby, you’re probably beginning to wonder how to tighten your post-baby belly. For most women, it will take some time to get your pre-pregnancy body back, but it is possible!

As soon as you give birth, your body will begin working on returning to normal. Keep in mind that your belly slowly expanded over 9 months, so don’t be surprised when it doesn’t flatten overnight. While your body will naturally revert to its pre-pregnancy state over time, there are specific exercises you can do to speed up the process.

Typically, you should wait at least 6 weeks after childbirth to begin working out and dieting, but your body may require more time. It’s important to speak with your doctor before starting any kind of postpartum exercise regimen or diet.  

Core Anatomy & Function

Your core is made up of multiple layers of muscle, running in every different direction. The core serves many vital functions, including: supporting and protecting the internal organs, bending and rotating, and maintaining posture by supporting the spine. The core also aids in pregnancy and childbirth by supporting the baby and helping you to breathe and push during labor.

Strengthening your core before getting pregnant may allow the pregnancy and childbirth process to go much smoother. If you want to strengthen your core before pregnancy, try this 20-Minute Core Strength Workout. All of the muscles of the core are stretched during pregnancy, so after birth, your belly may be feeling a little loose. If you want to get your pre-pregnancy body back, you must tighten all of the core muscles back up.

Common Post-Baby Condition

There is a condition called Diastasis Recti that approximately 60% of new moms experience. One study has shown that 40% of women will still have Diastasis Recti at 6 months postpartum. It is not a dangerous condition, however, it can greatly affect your post-baby belly.

One of the main core muscles is called the Rectus Abdominis, but you probably know it as your “6-pack” muscle. This muscle runs vertically down the center of your abdomen and is separated into left and right halves. Diastasis Recti is when the Rectus Abdominis separates due to weakened connective tissue. In order to tighten your tummy, you must strengthen this connective tissue back up.

Many women believe that in order to flatten their tummies after pregnancy, they must perform abdominal exercises like crunches. Traditional crunches are actually counterproductive to this process, as they will actually cause further separation of the rectus abdominis. This is due to the fact that tightening the muscles, will cause the connective tissue to weaken even further. It’s important to note that sit-ups and planks should be avoided in the beginning, as well.

So if you shouldn’t perform traditional crunches, sit-ups or planks, what should you do? The following 4 moves will show you how to tighten your post-baby belly, safely and effectively.

4 Moves to Tighten Your Post-Baby Belly

What you need: Interval timer / Yoga Mat or Towel / Broomstick or Body Bar

What you do: Perform each exercise for the number of reps/duration provided. Perform 3-5 rounds. For best results, perform this routine 6 days a week.

We’ve included instructional videos for each exercise at the bottom of this post.

*It’s extremely important that you engage the core throughout the duration of each of the following moves.

  1. Drawn-In Holds (Vacuums) : Hold for 30-60 seconds
  2. Pelvic Tilts : Perform 20 repetitions
  3. Drawn-In Broomstick Rotations : Slowly rotate from side to side for 30-60 seconds
  4. Heel Slides with Core Activation : Perform 10 repetitions per leg

Instructional Videos

Drawn-In Holds (Vacuums)

Pelvic Tilts

Drawn-In Dowel Rotations

Heel Slides with Core Activation\

These are 4 of the most effective postpartum exercises that you can perform. What did you think of them? Do you have any tips on how to tighten your post-baby belly? Let us know in the comment section below.

Getting your pre-pregnancy belly back is not going to happen overnight, but it will come back eventually. With these exercises, you can speed the process up a bit!

Don’t forget that proper nutrition is key to not only staying healthy, but also losing weight. As a new mom, we know you don’t have tons of time to spend in the kitchen. Try these 8 Quick & Easy Meals Under 400 Calories.

Another way to lose a little extra weight after childbirth is to breastfeed. Not only is this good for the baby, but it will also help your body reset and requires more energy, which will lead to faster weight loss!

If you enjoyed this routine, you may also like to read about these 10 Extremely Useful Ways to Lose Weight After Pregnancy.

Follow us on Facebook, Pinterest, and Instagram to stay up-to-date on all of our core workouts!

The post How to Tighten Your Post-Baby Belly with These 4 Moves appeared first on Skinny Ms..


source https://skinnyms.com/how-to-tighten-your-post-baby-belly/

Wednesday, September 26, 2018

24 Lunch Recipes For Weight Loss

I don’t know about you, but one of the hardest things about weight loss is coming up with delicious, healthy lunches for the entire week. However, we all know how important meal planning is, especially when we want to stay on the straight and narrow and come up with lunch recipes for weight loss.

Without a plan, it’s too easy to give in to temptation. Before you settle for that fast-food drive-thru, check out these 24 lunch recipes for weight loss that will do more than just satisfy your hunger. Be sure to jot down your top favorites that you can try ASAP!

1. Chicken Salad

Chicken salad is a classic that so many of us love! If you’re looking for a protein-packed lunch (and hold the unnecessary fats), then this is definitely the right choice for you.

The hearty mixture of chicken, yogurt, and grapes, packed into a whole-wheat pita is just what you need to curb your hunger and cut back on those carbs.

2. Vegetarian Tortilla Soup

If you’re looking for one of the richest and most-filling lunch recipes for weight loss, then you have to try this vegetarian tortilla soup! It’s loaded with bold flavors and has a creamy texture that hits all the right spots.

Even if you don’t follow a strict vegetarian diet, eating meatless meals a few times a week can increase your energy. Plus, packing your meal full of veggies is a great way to get those valuable nutrients that your body needs to thrive.

3. Lite Tuna Melt Wrap

This lite tuna melt wrap is easy to throw together, but yields delicious results! Go for yogurt instead of mayo to avoid some of those unnecessary calories. Toss in some cheese, and of course the tuna, and put it all in a whole-wheat wrap. It’s a tasty meal with absolutely zero guilt!

It also happens to be packed with a ton of protein (30 grams, to be exact!), and you can even customize it a bit with your favorite peppers or pickles for a little crunch and burst of flavor.

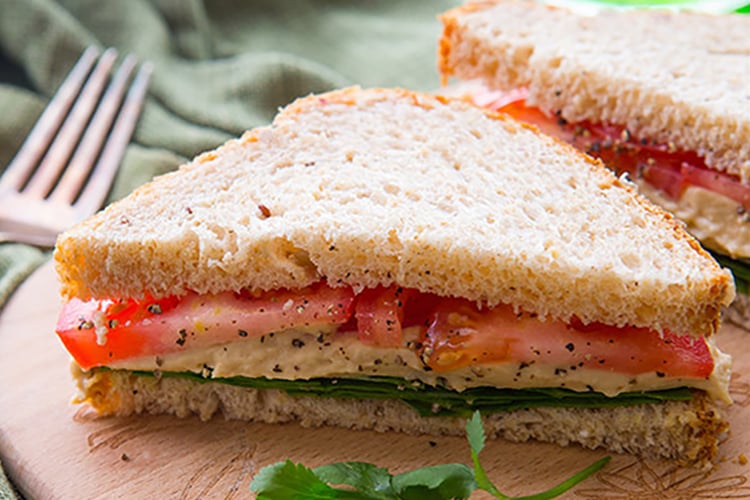
4. Tomato, Hummus, and Spinach Sandwich

Some of the healthiest lunches are the ones that have simple ingredients. Tomato, hummus, and spinach are all you need to create one of the most delicious sandwiches you’ll ever eat! It’s quick to put together so you can even whip it together when you’re strapped for time.

Choose your favorite hummus and make sure you pick the juiciest tomato that your local grocer has to offer. Pile it all on a couple of slices of multigrain bread, and you have yourself a healthy and satisfying lunch.

5. Zucchini-Bell Pepper Pizza 

Never settle for delivery again! This zucchini-bell pepper pizza is loaded with nutritious veggies and has a ton of nutrients that will give your body the fuel it needs to give it your all during your next workout. It may taste like a cheat day, but this pizza recipe is actually healthy!

The post 24 Lunch Recipes For Weight Loss appeared first on Skinny Ms..


source https://skinnyms.com/24-lunch-recipes-for-weight-loss/

How and Why To Use A Bullet Journal

Have you heard about how and why to use a bullet journal? No, I’m not trying to sell you something: it’s not actually a product for sale. All you need is a blank notebook and a pen to create your very own journal. Still not convinced? Before you stop reading, let me tell you one more thing. I’m even going to put it in all caps so it catches your attention before you click on to the next post! A BULLET JOURNAL IS BETTER THAN YOUR ONLINE SYSTEM.

Yes, it’s true! Your app-based organization system that syncs from platform to platform can’t hold a candle to this pen-and-paper technique. The system uses something called Rapid Logging and you can use it for everything. It’s helpful for your to-do and grocery list as well as tracking your daily habits. You can record your daily food intake in it, keep track of your workouts, create a bucket list, plan a vacation, or simply collect your thoughts about life, the universe, and everything. It’s the most useful tool you’ll ever have and it will soon become your constant companion.

Interested yet? Good, because I’m about to explain everything you ever wanted to know about how and why to use a bullet journal.

What Makes the Bullet Journal Special?

Part of what makes the bullet journal so special is that it’s an analog device. Studies have found that we actually learn better (and recall more information) from print sources as opposed to tablets and e-readers. There’s something about holding onto the paper and putting the pen to something physical that engages our brain more than clicking on a tablet.

Now, you can walk into a book store and you’ll find an entire shelf filled with analog planners and organizers. Incidentally, the app store on your phone has just as many options (but we’ve already learned that analog is better). But, you can forget about all of those high-priced items. Once you learn how and why to use a bullet journal, it’s absolutely going to change your life.

A bullet journal is uniquely yours. It’s not fancy and it’s not complicated: it just starts with a blank notebook. You can use a ruled notebook if you like, or choose a book with square boxes or dots. Personally, we like this one, but a journal of any size, shape, and color will work. It just needs to be blank.

How the Bullet Journal Works

The bullet journal has a few components, so we’ll walk through them one-by-one. First, you must number every page. You don’t have to do it in advance, but as you create pages, you must give them a number. This is the backbone of the organization system.

Next up, you’ll start with an Index page. This is the page that helps you find everything in the book. The first entry on your Index page will list the page numbers of the Index page. Simple, right? So you’ll write “Index…1-2.” As you add entries, you’ll write the title and page numbers of every other entry in your bullet journal. You’ll want to save yourself at least two pages for the index, because it can get long over time.

The entries are called Topics. In addition to writing them on the Index page, you’ll write the Topic at the top of the first entry page. This can be “Food Log” or “Dream Journal” or “Grocery List.” Whatever the pages is about, that’s your Topic.

Then, the system uses Bullets to keep yourself organized. Bullets can be Tasks, which are represented by a dot. These dotted Tasks are the things that you need to get done. Bullets can also be Events, which would be represented by an “O.” Finally, a Bullet that is a Note is indicated by a “-“. Your Notes represent things that aren’t actionable, but you want to remember.

You can also use “>” to migrate a Task to a later date, or “<” to indicate that it’s been scheduled. Don’t worry, we’ll talk more about this in a minute.

Creating a Bullet Journal

Now that you know how and why to use a bullet journal, let’s talk about how to set one up. We’ll start with the Index page – we already talked about that in the last section, so we’ll move on to your Topics. Most people start their journal with a few common Topics.

After the Index, you’ll want to create an entry called the “Future Log.” This entry lists the next six months and leaves space for you to record important events or things you want to remember about the next few months. This could include your weight-loss or fitness goals, along with weddings, birthdays, and important deadlines.

Next up comes the “Monthly Log.” On the left side of the page, the log will list every day of the month. It can be a list of all the numbers, or you can actually create boxes like a real calendar. Make it look as beautiful or simple as you wish – after all, it’s your journal! On the right side of the page, leave yourself an open page to write down the tasks for the month. You can choose to use the Monthly Log in one of two ways – as a scheduling piece, or as a journal to write down what happened each day.

After that, you’ll create a “Daily Log.” This is designed for day-to-day use, either as a way to schedule tasks or record daily actions. It’s best not to set up these pages ahead of time. After all, you never know what the day will bring and how many pages you’ll need!

Migrating Tasks

Remember those migration symbols we talked about earlier? These will helpful on the log pages! For example, let’s say you had an entry on your Daily Log that listed:

  • Call Mom
  • Go grocery shopping
  • Plan upcoming trip

If all of these had dots next to them, you’d know that nothing has happened for any of them. An “X” next to one would indicate that it’s done – congratulations! When you see the symbol “<“, that would mean you’ve scheduled that for a specific time. On the other hand, the symbol “>” would mean that you’ve “migrated” it – or moved it – to a later date or time.

Migrating tasks gives you a quick and easy way to glance at your to-do list and know what still needs to be addressed.

Customizing your Bullet Journal

You’ve grasped the bare-bones of how and why to use a bullet journal, so now you can start to customize. In between each of these logs, you can create your own pages. That might be “Books I’d Like to Read” or “Fun Recipes To Try.” The beauty of the Index page is that you can pepper these things in-between entries and you’ll always be able to find them.

From here, you can get as fancy or as simple as you like. Use colored pencils or stickers to give yourself a visual indication of how things are going, or use the same pen or pencil for everything. Learn as you go, and know that there’s no such thing as a “wrong” entry in your bullet journal. After all, it belongs to you and you can do whatever you want with it!

What’s our favorite thing in the world? Inspiring and motivating you to become your best self! Sign up for our newsletter or follow us on Facebook to join our community of health-conscious individuals.

The post How and Why To Use A Bullet Journal appeared first on Skinny Ms..


source https://skinnyms.com/how-and-why-to-use-a-bullet-journal/

19 100-Calorie, Gluten-Free Snacks

If you’re adjusting to a new gluten-free diet, snacking is going to be a challenge. It’s definitely hard to find gluten-free treats that are filled with healthy ingredients, but you don’t want to stop snacking. After all, staying full in between meals is an important part of any healthy diet! It not only keeps your body filled with energy, but it helps you stay satiated until the next meal. That means less binging and more success in meeting your weight-loss goals! These 100 calorie gluten-free snacks will help you get there without feeling guilty. It’s about snacking smarter, not snacking less!

The big problem with removing gluten from your diet is that it denies you access to many store-bought, healthy snacks. It leaves you finding it all-too-easy to reach for that bag of unhealthy (but, gluten-free) potato chips, so we wanted to make it easier for you by sharing this list of 100 calorie gluten-free snacks. Each snack is delicious and easy to make, and many of them make perfect grab-and-go style snacks for your on-the-go lifestyle.

1. No-Bake Oatmeal Raisin Energy Bites

This is my favorite gluten-free snack. You don’t have to do any cooking at all and it makes a fridge full of grab-and-go snacks! Keep in mind that to hit the 100-calorie mark, you’ll have to eat half of the recommended 2-ball serving size (that just means more snacks for later in the week).

2. 5-Ingredient Buckwheat Crepes

This gluten-free, vegan recipe from Minimalist Baker is perfect when you want a quick pick-me-up. This 71 calorie snack is delicious on its own, or you can fill them with fresh fruit, a dollop of coconut yogurt, or a bit of jam. Tasty, delicious, and filling!

3. Baked Parmesan Kale Chips

If you’re going gluten-free, you need a few good root vegetable or kale chip recipes. This recipe from Sugar-Free Mom crisps up to perfection in the oven and it makes a perfect accompaniment to salsas or hummus. Or, enjoy it as a stand-along snack.

4. 15-Minute Zucchini Noodle and Tomato Salad wtih Balsamic Dressing

This is such a great snacking recipe because it only takes 15 minutes to pull it together. This fresh salad is packed full of nutrient-dense vegetables while also satisfying your sweet tooth with that incredible balsamic dressing. If you’re not a fan of salads as a snack, give this a try and it might change your mind!

5. Golden Turmeric Hummus

Hummus is one of my favorite gluten-free snacks. It tastes great with raw vegetables or root vegetable chips, and it’s portable so you can pack it in an air-tight container and bring it with you to work. This recipe from the Minimalist Baker is also infused with anti-inflammatory spices: turmeric and ginger!

6. Homemade Naturally Sweetened Blueberry Fruit Roll Ups

Fruit roll-ups don’t have to be for kids! This clean-eating snack from Sugar-Free Mom only has three ingredients and it will definitely satisfy your sweet tooth. You don’t even need a dehydrator – you can pull this recipe off in a low-temperature oven.

7. Roasted Corn and Basil Stuffed Tomatoes

When you need a snack that feels pretty substantial, turn to this recipe from Pinch of Yum. Each tomato only has 90 calories but they’re cheesy, rich, and satisfying. They reheat really well, too, so feel free to pack one with you to the office and reheat it in the microwave.

8. Rainbow Salsa Recipe

There’s nothing you can’t do with this 79 calorie salsa recipe! In addition to using it as an egg topping for breakfast and eating it on tacos, it tastes great on its own scooped up with some root vegetable chips.

9. Easy Vegan Gluten-Free Biscuits

If you’re a fan of flaky biscuits, you have to check out this tasty snack from the Minimalist Baker. We love these for breakfast just as much as a midday snack. In fact, we’d be fine chowing down on these any time of day!

The post 19 100-Calorie, Gluten-Free Snacks appeared first on Skinny Ms..


source https://skinnyms.com/100-calorie-gluten-free-snacks/